Software
Using Jupyter at HPC2N
Running JupyterLab at HPC2N
Since the JupyterLab will only be accessible from within HPC2N's domain, it is by far easiest to do this from inside ThinLinc, so this is highly recommended. You can find information about using ThinLinc at HPC2N here: https://www.hpc2n.umu.se/documentation/guides/thinlinc
1) At HPC2N, you currently need to start JupyterLab on a specific compute node. To do that you need a submit file and inside that you load the JupyterLab module and its prerequisites (and possibly other Python modules if you need them - more about that later).
NOTE: HPC2N and most other HPC centers in Sweden use modules to handle their software. You can read more about modules here: https://www.hpc2n.umu.se/documentation/environment/lmod
To see the currently available versions, do
module spider JupyterLab
You then do
module spider JupyterLab/<version>
for a specific <version> to see which prerequisites should be loaded first.
Example, loading JupyterLab/3.2.8
module load GCC/10.3.0 JupyterLab/3.2.8
2) Making the submit file
Something like the file below will work. Remember to change the project id, how many cores you need, and how long you want the JupyterLab to be available:
#!/bin/bash # Here you should put your own project id #SBATCH -A hpc2nXXXX-YYY # This example asks for 1 core #SBATCH -n 1 # Ask for a suitable amount of time. Remember, this is the time the Jupyter notebook will be available! HHH:MM:SS. #SBATCH --time=05:00:00 # Clear the environment from any previously loaded modules module purge > /dev/null 2>&1 # Load the module environment suitable for the job module load GCC/10.3.0 JupyterLab/3.2.8 # Start JupyterLab jupyter lab --no-browser --ip $(hostname)
Where the flags used to the Jupyter command has the following meaning (you can use Jupyter --help and Jupyter lab --help to see extra options):
- lab: This launches JupyterLab computational environment for Jupyter.
- --no-browser: Prevent the opening of the default url in the browser.
- --ip=<IP address>: The IP address the JupyterLab server will listen on. Default is 'localhost'. In the above example script I use $(hostname) to get the content of the environment variable for the hostname for the node I am allocated by the job.
Note again that the JupyterLab is only accessible from within the HPC2N domain, so it is easiest to work on the ThinLinc.
3) Submit the above submit file. Here I am calling it MyJupyterLab.sh
sbatch MyJupyterLab.sh
4) Get the URL from the SLURM output file.
Wait until the job gets resources allocated. Check the SLURM output file; when the job has resources allocated it will have a number of URLs inside at the bottom.
The SLURM output file is as default named
NOTE: Grab the URL with the hostname since the localhost one requires you to login to the compute node and so will not work!
The file will look similar to this:
b-an01 [~]$ cat slurm-22422626.out [I 2023-05-11 15:06:23.597 ServerApp] jupyterlab | extension was successfully linked. [I 2023-05-11 15:06:23.756 LabApp] JupyterLab extension loaded from /hpc2n/eb/software/JupyterLab/3.2.8-GCCcore-10.3.0/lib/python3.9/site-packages/jupyterlab [I 2023-05-11 15:06:23.756 LabApp] JupyterLab application directory is /cvmfs/ebsw.hpc2n.umu.se/amd64_ubuntu2004_bdw/software/JupyterLab/3.2.8-GCCcore-10.3.0/share/jupyter/lab [I 2023-05-11 15:06:23.760 ServerApp] jupyterlab | extension was successfully loaded. [I 2023-05-11 15:06:23.761 ServerApp] Serving notebooks from local directory: /pfs/stor10/users/home/b/bbrydsoe [I 2023-05-11 15:06:23.761 ServerApp] Jupyter Server 1.13.4 is running at: [I 2023-05-11 15:06:23.761 ServerApp] http://b-cn0232.hpc2n.umu.se:8888/lab?token=4e369c85f797f7de0c4e15723af75e93ad6bbe7cba11ae59 [I 2023-05-11 15:06:23.761 ServerApp] or http://127.0.0.1:8888/lab?token=4e369c85f797f7de0c4e15723af75e93ad6bbe7cba11ae59 [I 2023-05-11 15:06:23.761 ServerApp] Use Control-C to stop this server and shut down all kernels (twice to skip confirmation). [C 2023-05-11 15:06:23.778 ServerApp] To access the server, open this file in a browser: file:///pfs/stor10/users/home/b/bbrydsoe/.local/share/jupyter/runtime/jpserver-173465-open.html Or copy and paste one of these URLs: http://b-cn0232.hpc2n.umu.se:8888/lab?token=4e369c85f797f7de0c4e15723af75e93ad6bbe7cba11ae59 or http://127.0.0.1:8888/lab?token=4e369c85f797f7de0c4e15723af75e93ad6bbe7cba11ae59
In this case you should use this one:
http://b-cn0232.hpc2n.umu.se:8888/lab?token=4e369c85f797f7de0c4e15723af75e93ad6bbe7cba11ae59
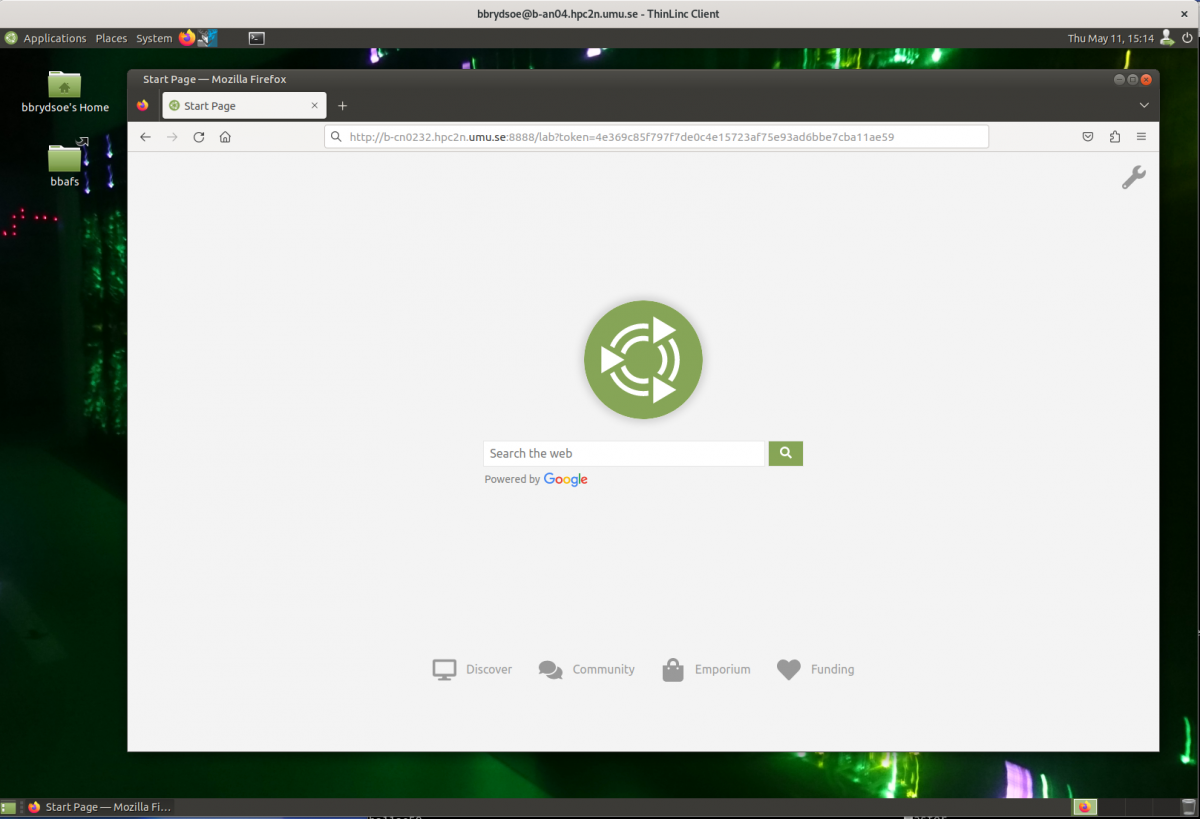
5) Start a webbrowser within HPC2N (ThinLinc interface). Put in the URL you grabbed, including the token:
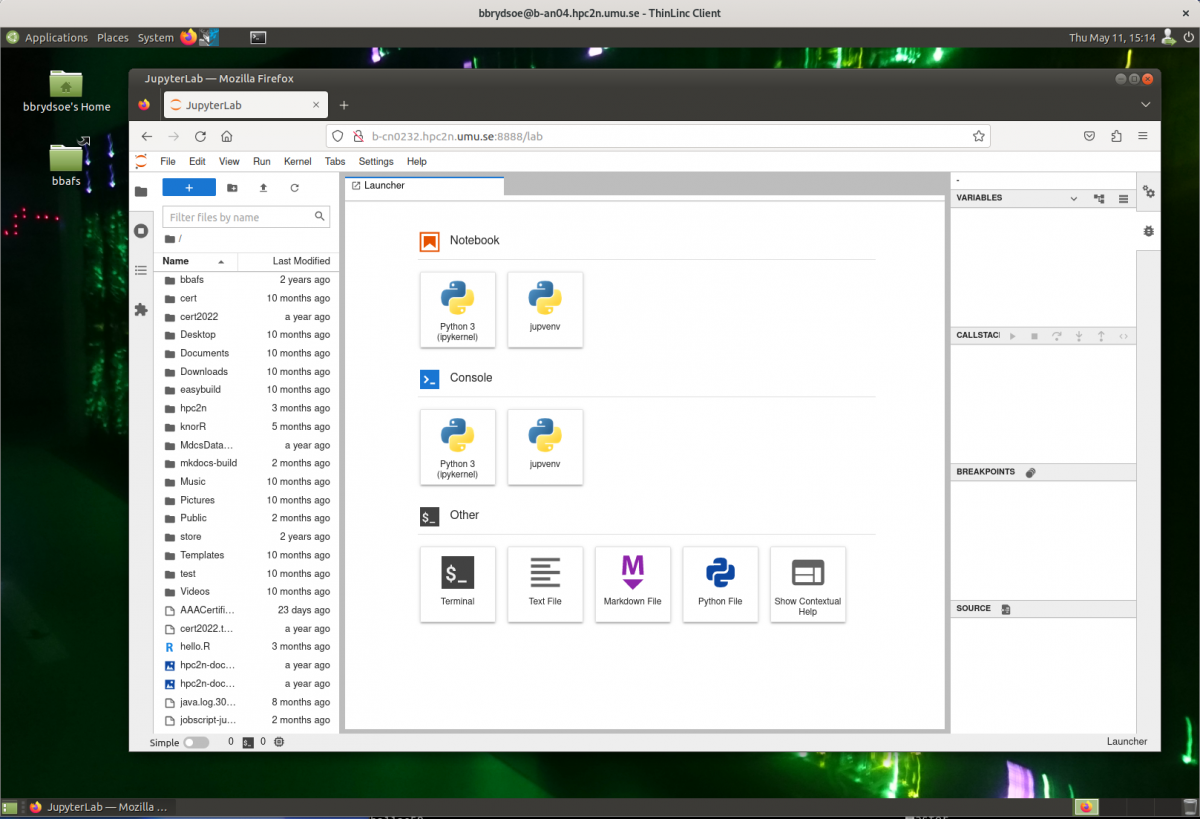
After a few moments JupyterLab starts up:
You shut it down from the menu with "File" -> "Shut Down"
Running JupyterLab at HPC2N - extra Python modules
Already installed at HPC2N
If you need extra Python modules and these modules are already installed at HPC2N, you can just load them. It is easiest to do so before you start the JupyterLab, inside the submit file.
Example, loading JupyterLab/3.2.8, its prerequisites, and the modules for SciPy-bundle (mpi4py, numpy, pandas, scipy etc.) and matplotlib :
#!/bin/bash # Here you should put your own project id #SBATCH -A hpc2nXXXX-YYY # This example use 1 core #SBATCH -n 1 # Ask for a suitable amount of time. Remember, this is the time the Jupyter notebook will be available! HHH:MM:SS. #SBATCH --time=05:00:00 # Clear the environment from any previously loaded modules module purge > /dev/null 2>&1 # Load the module environment suitable for the job module load GCC/10.3.0 JupyterLab/3.2.8 OpenMPI/4.1.1 SciPy-bundle/2021.05 matplotlib/3.4.2 # Start JupyterLab jupyter lab --no-browser --ip $(hostname)
See here for an explanation of the options to jupyter.
With some own-installed Python packages
Running JupyterLab with some own-installed Python packages requires you to use a virtual environment and your own Jupyter kernel. This is not as difficult as it may sound.
Example Own-installed pyDOE and torch. Using JupyterLab/3.4.2
1) First we need to load the modules that we need for our own-installed packages, and for the JupyterLab.
pyDOE and torch has some prerequisites, some of which are already installed at HPC2N. We will start by loading the available prerequisite modules:
module load GCC/10.3.0 JupyterLab/3.2.8 OpenMPI/4.1.1 SciPy-bundle/2021.05 matplotlib/3.4.2
2) We now need to create a virtual environment (venv) to install our own packages in. I am placing it in the Public directory under my home directory ($HOME), but you could instead place it in your project storage. I am calling the venv "jupvenv", but you can call it what you want:
python -m venv $HOME/Public/jupvenv
3) Activate the venv
source $HOME/Public/jupvenv/bin/activate
4) Install ipykernel in the venv. This is needed to be able to make your own Jupyter kernel which can use the own-installed Python packages
pip install --no-cache-dir --no-build-isolation ipykernel
NOTE! It may complain of missing prerequisites. If so, instead install:
pip install --no-cache-dir --no-build-isolation pyparsing pytz jinja2 packaging webencodings cffi babel jsonschema requests tomlkit wheel ipykernel
5) Install your Python packages in the venv, here pyDOE and torch
pip install --no-cache-dir --no-build-isolation pyDOE torch
6) Install the new kernel in Jupyter (here called jupvenv)
python -m ipykernel install --user --name=jupvenv
7) Check list of kernels to see your new kernel
jupyter kernelspec list
Later you can remove the kernel if you feel like, using this:
jupyter kernelspec uninstall jupvenv
8) Now make a submit file as before. Something like this should work:
#!/bin/bash # Here you should put your own project id #SBATCH -A hpc2nXXXX-YYY # Here allocating 1 core - change as suitable for your case #SBATCH -n 1 # Ask for a suitable amount of time. Remember, this is the time the Jupyter notebook will be available! #SBATCH --time=05:00:00 # Clear the environment from any previously loaded modules module purge > /dev/null 2>&1 # Load the module environment suitable for the job module load GCC/10.3.0 JupyterLab/3.2.8 OpenMPI/4.1.1 SciPy-bundle/2021.05 matplotlib/3.4.2 # Activate the venv you installed your own Python packages to source $HOME/Public/jupvenv/bin/activate # Start JupyterLab jupyter lab --no-browser --ip $(hostname)
See here for an explanation of the options to jupyter.
9) Submit the above submit file (here I named it MyJupvenv.sh).
sbatch MyJupvenv.sh
You get the <job-id> when you do the above command.
Check the SLURM output file (slurm-<job.id>.out); grab the URL with the hostname as described in the first part of this document, since the localhost one requires you to login to the compute node.
10) Start a webbrowser within HPC2N (ThinLinc interface). Put in the URL you grabbed, including the token.
11) Inside JupyterLab, start the new kernel. Just click the launcher for that one if no other kernel is running.
If a kernel is running (shown under kernels), then shut down that kernel and click "Kernel" in the menu, and then "Change kernel". Pick your kernel from the drop-down menu.
12) You can now run your files etc. with the own-installed Python packages available.
NOTE! Sometimes it is still running on the default kernel. If so, Click the 3 little dots in the right side of the editor-window for the program and pick your kernel. Then rerun your files.